Send An Email with an Attachment When an Event is Created or Event Date Revised : jenwlee
by: jenwlee
blow post content copied from Jenwlee's Salesforce Blog
click here to view original post

This blog post was inspired by Yvonne Navas.
Here are a few lessons learned from implementing this use case:
- Use an email alert with a Classic Email Template to send an email with a file attachment
- Use a record triggered after save/update flow to send the appropriate email
Business Use Case: Addison Dogster is the system administrator at Universal Containers. Samantha Smith is the Operations manager who is currently managing their program engagements program. When a new event is created associated with a Program Engagement record, Universal Containers will send an email confirmation with an attachment to the Contact along with the Program Engagement Reference Number and Event details.
Solution: First, Addison needed to create two email templates associated to two email alerts. Since we are taking action (send email) after a record is created and/or edited, the best flow solution is a record triggered after save/update flow.
The automation solution (record triggered flow) looks like this:

This record triggered flow will execute when a record is created or updated where the event subject is “Preliminary Event” and the related starts with “003” (i.e. Contact), after the record is saved. It will determine whether the event is new or the event start date/time has changed, then it will send the appropriate email confirmation with the event details and an attachment.
Highlighted Steps:
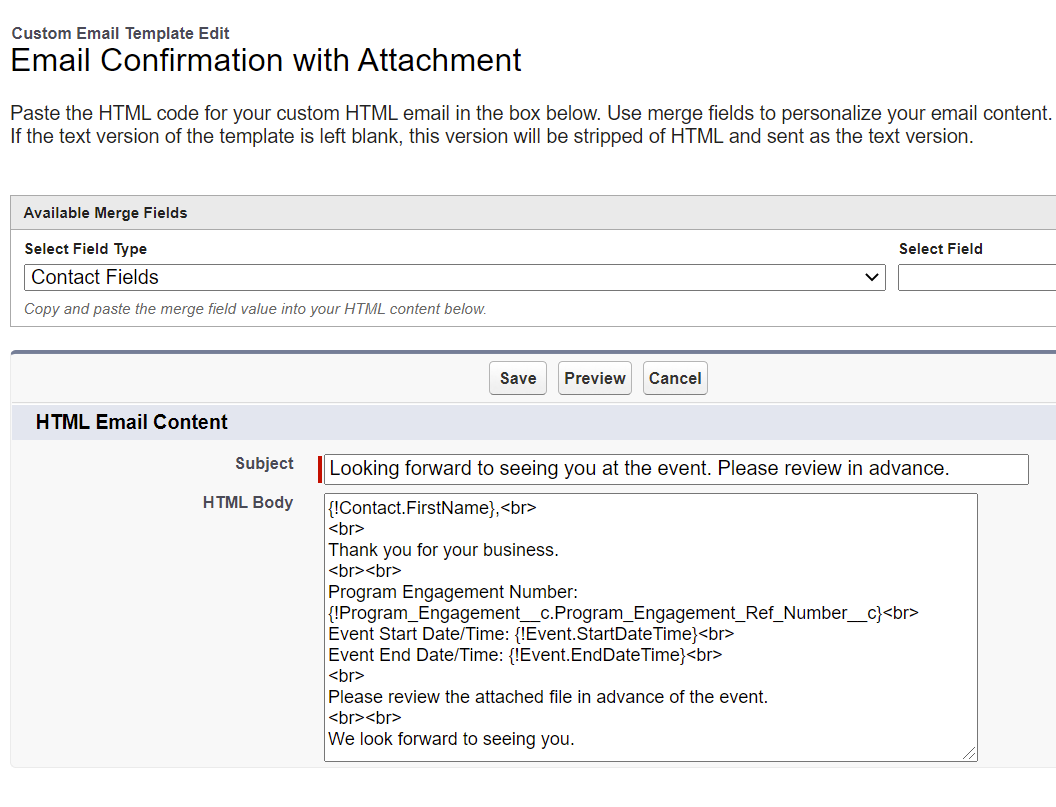
1.Create a Classic Email Template (Setup | Classic Email Templates | New Template). Here, Addison chose Custom (without using Classic Letterhead). This email will be sent to confirm for a new event. It references the program engagement number (custom object | custom field) and the event date start and end date/times, plus a file attachment.
Best practice tip: Provide a description so you and other/future admins know what this email template is used for.
Configure it to match the below:
- Email Template Name: Email Confirmation with Attachment
- Description: Email confirm with event info and attachment
- Subject: Looking forward to seeing you at the event. Please review in advance.
- HTML Body:
{!Contact.FirstName},<br><br>
Thank you for your business.
<br><br>
Program Engagement Number: {!Program_Engagement__c.Program_Engagement_Ref_Number__c}<br>
Event Start Date/Time: {!Event.StartDateTime}<br>
Event End Date/Time: {!Event.EndDateTime}<br>
<br>
Please review the attached file in advance of the event.
<br><br>
We look forward to seeing you.
- Scroll down to the Attachments related list, Attach File and select the file to attach.
2. Create an Email Alert (Setup | Email Alerts | New Email Alert) that references the email template created in Step 1.
Configure as follows:
- Description: Email Confirm with Attachment
- Unique Name: Email_Confirm_with_Attachment
- Object: Event
- Email Template: Email Confirmation with Attachment
- Recipient Type: Email Field: Email

3. Create another Classic Email Template like Step 1. This email will be sent to confirm an event date change. It references the program engagement number (custom object | custom field) and the revised event date start and end date/times, plus a file attachment.
- Email Template Name: Event Date Change Confirmation with Attachment
- Description: Email sent to confirm event change date with attachment
- Subject: Email Confirmation: Event Date Change
- HTML Body:
{!Contact.FirstName},<br>
<br>
This email confirms the event date change.
<br><br>
Program Engagement Number: {!Program_Engagement__c.Program_Engagement_Ref_Number__c}<br>
<br>
Here is your revised event details:<br>
Event Start Date/Time: {!Event.StartDateTime}<br>
Event End Date/Time: {!Event.EndDateTime}<br>
<br>
Please review the attached file in advance of the event.
<br><br>
We look forward to seeing you.
- Scroll down to the Attachments related list, Attach File and select the file to attach.

4. Create an Email Alert (Setup | Email Alerts | New Email Alert) that references the email template created in Step 3.
Configure as follows:
- Description: Event Change Email Confirm with Attachment
- Unique Name: Event_Change_Email_Confirm_with_Attachment
- Object: Event
- Email Template: Event Date Change Confirmation with Attachment
- Recipient Type: Email Field: Email

5. Create the record triggered flow shown above. In Lightning Experience, it is found under Process Automation | Flows. Click on “New Flow.” Select Scheduled Flow. For those using Salesforce Classic, flow can be found in Create | Workflows & Approvals | Flows. Select the Record Triggered Flow and click the Create button.
A. Configure the flow trigger by clicking Edit in the trigger section.
Configure as follows:
- Trigger the Flow When: A record is created or updated
- Run the flow: After the record is saved

B. Configure the Object by clicking Edit in the object section.
Configure as follows:
- Object: Event
- Condition Requirements: All Conditions Are Met (AND)
- Subject Equals Preliminary Event
- WhoId Starts with 003 (Note: to get the object prefix, navigate to a contact record and take the first 3 characters, 003.)
- When to Run the Flow for Updated Records: Every time a record is updated and meets the condition requirements

C. We need to create a decision flow element called New Event or Event Start Date/Time Changed to determine whether the event is new or the event start date/time is changed.
Best practice tip: Provide a description so you and other/future admins know what this flow resource is used for.
This is how that flow resource would be configured.
- Outcome: New Event
- Condition Requirements to Execute Outcome: All Conditions Are Met (AND)
- {!$Record.Id} Is Null True (new records are not yet saved to Salesforce and therefore, do not have an Id)
- Outcome: Event Start Date/Time Changed
- Condition Requirements to Execute Outcome: All Conditions Are Met (AND)
- {!$Record__Prior.StartDateTime} Does Not Equal {!$Record.StartDateTime} (Note: You cannot use the ISChanged formula syntax in flow. So, what we are doing here is a comparison of the prior event start date/time to the current event start date/time. If it is not the same, this means the value is changed.)

D. Next, create an Action with the email alert Email Confirm with Attachment called Send Email Confirm. This will send the email alert Email Confirm with Attachment and associate it to the event (record.Id).
Best practice tip: Provide a description so you and other/future admins know what this action is used for.
This is how that action would be configured.
- Record ID: {!$Record.Id}

E. Now, create another Action with the email alert Event Change Email Confirm with Attachment called Send Event Change Confirm. This will send the email alert Event Change Email Confirm with Attachment and associate it to the event (record.Id).
Best practice tip: Provide a description so you and other/future admins know what this action is used for.
This is how that action would be configured.
- Record ID: {!$Record.Id}

F. Next, we need to connect the flow elements to match the screenshot below.

G. Save your flow. Let’s call it Send Email Confirmation with Event Details and Attachment.
Best practice tip: Provide a description so you and other/future admins know what this flow is for.

H. Activate the flow.
Test the scheduled flow:
- From the Program Engagement record, create a new event with the subject “Preliminary Event,” associate it to a contact and set the event start and end date/time.
- Verify that the email sent to the contact’s email address was the Email Confirm with Attachment.
- From the Program Engagement record, for an existing event with the subject “Preliminary Event” and is associated to a contact, change the the event start date/time.
- Verify that the email sent to the contact’s email address was the Event Change Email Confirm with Attachment.
- From the Program Engagement record, create a new event either with a subject that is not “Preliminary Event” or not associated to a contact and set the event start and end date/time.
- Verify that an email is not sent.
- From the Program Engagement record, for an existing event that either does not have a subject “Preliminary Event” or is not associated to a contact, change the the event start date/time.
- Verify that an email is not sent.
Deployment Notes/Tips:
- The email templates, email alerts and record triggered flow can be deployed to Production in a change set (or can be deployed using a tool such as Metazoa’s Snapshot).
- You will find the flow in a change set under the Flow Definition component type.
- Activate the flow post deployment as flows deploy inactive in Production, unless you have opted in on the Process Automation Settings screen, to “Deploy processes and flows as active.” NOTE: With this change, in order to successfully deploy a process or flow, your org’s Apex tests must cover at least 75% of the total number of active processes and active autolaunched flows in your org or you can select 0%, which will run the apex classes not related to your flow.
March 08, 2021 at 06:30PM
Click here for more details...
=============================
The original post is available in Jenwlee's Salesforce Blog by jenwlee
this post has been published as it is through automation. Automation script brings all the top bloggers post under a single umbrella.
The purpose of this blog, Follow the top Salesforce bloggers and collect all blogs in a single place through automation.
============================
Post a Comment