Clone a Task/Log a Call for Multiple Accounts : jenwlee
by: jenwlee
blow post content copied from Jenwlee's Salesforce Blog
click here to view original post

Sometimes, a customer service rep (CSR) may service a person that is associated with multiple WhatIds (accounts, policies, opportunities, etc.) and when they create a task or log a call, they can only relate the task to one account, policy, opportunity, etc. There is no option to relate it to multiple things. Instead, they create the first log a call or task and relate it to the one account, policy, opportunity, etc. and then they clone the log a call/task and relate it to another account, policy, opportunity, etc. If there is another account, policy, opportunity, etc., they need to repeat the cloning step again.
What if, we can make this more efficient for the CSR?
What if, they can select the accounts, policies, opportunities, whatever they need to relate the task to on one screen and upon submit, it clones the tasks for each account, policy, opportunity, or whatever it is for them?
Mind blown! Let’s delight those CSRs and increase their overall productivity so they can move onto the next customer.
Here are a few lessons learned from implementing this use case:
- Use conditional visibility to ask for additional information, as needed, rather than show all fields at once.
- Reference “/{!record variable}” in the link to provide a hyperlink to the record detail page.
- Assign task values to a variable within a loop
- Add a variable record to a collection within a loop
- Best practice – create records outside of a loop, not in it.
Business Use Case: Addison Dogster is the system administrator at Universal Containers. Samantha Smith is the Operations manager who is currently managing their program engagements program. Her CSRs are servicing customers as quickly as they can. But cloning log a calls/tasks to relate to multiple accounts is bogging them down. It’s too many clicks. Is there an easier way for the CSR to specify multiple accounts and have Salesforce do the magic behind the scenes? Yes, this is where the magic of automation comes in!
Solution: Addison Dogster solved this problem with an Add Multiple Accounts button on the task record page that shows a screen flow where the CSR can specify the accounts and then Addison has Salesforce perform the magic by cloning the task for each account specified.
Here is a demo of the solution:

The automation solution (screen flow) looks like this:

(1) We ask the CSR to specify up to 5 accounts. (2) Then, we assign the accountId to an Account collection variable. (3) Next, we do a Get Records to get the task information for cloning purposes. (4) Next, we enter the loop where we take each account in the Account collection variable. (5) We determine whether the loop record has a value. This is in the case where the CSR did not select 5 accounts. We cannot create a task where we don’t have an account. (6) If the loop record id has a value (i.e. account), we will assign the task values to the varNewTask variable using the values from the original task – cloning the task. In Step 7, we will add the loop record to the collection of tasks we will create once we complete the loop. (8) After we are done with the loop, we will create records for all the records in the TaskRecordsToBeCreatedCollection collection variable. Lastly, (9) we show a confirmation screen that lists out the accounts for which we created a cloned task with a link back to the original task.
Highlighted Steps:
1. Create the screen flow shown above. In Lightning Experience, it is found under Process Automation | Flows. Click on “New Flow.” Select Scheduled Flow. For those using Salesforce Classic, flow can be found in Create | Workflows & Approvals | Flows. Select the Screen Flow and click the Create button.
In the flow, we would configure the following flow resources.
A. We need to create a variable resource to store the task recordId passed from the button.
Best practice tip: Provide a description so you and other/future admins know what this flow resource is used for.
This is how that flow resource would be configured.
- Resource Type: Variable
- API Name: recordId
- Data Type: Text
- Availability Outside the Flow:
- Available for input: Checked
- Available for output: Unchecked

B. We need to create a variable to store field values for the varNewTask. This variable holds the values for the new cloned task record.
Best practice tip: Provide a description so you and other/future admins know what this flow resource is used for.
This is how that flow resource would be configured.
- Resource Type: Variable
- API Name: varNewTask
- Data Type: Record
- Object: Task

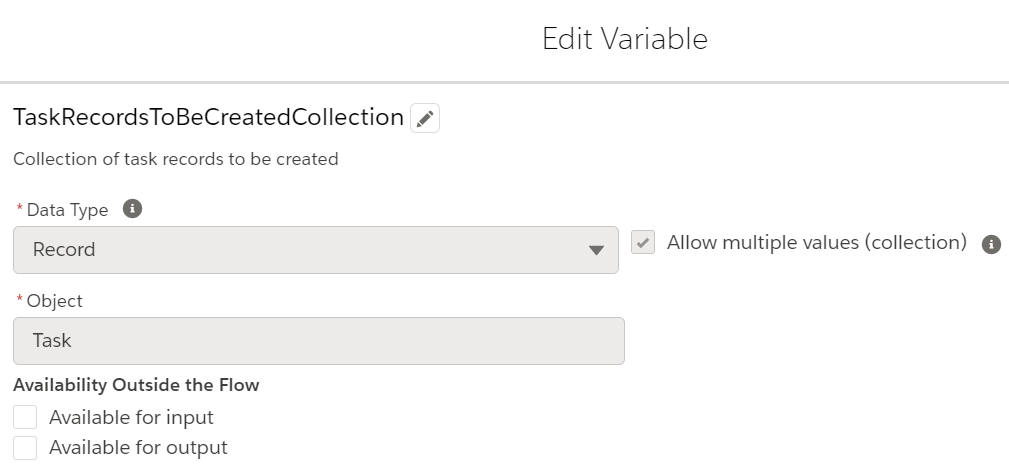
C. For our last flow resource, we will configure a collection variable to store task records called TaskRecordsToBeCreatedCollection. This will hold a varNewTask record for each account we are cloning the task for.
Best practice tip: Provide a description so you and other/future admins know what this flow resource is used for.
This is how that flow resource would be configured.
- Resource Type: Variable
- API Name: TaskRecordsToBeCreatedCollection
- Data Type: Record
- Allow multiple values (collection): checked
- Object: Task
D. First, we configure a Screen flow element to collect up to 5 accounts which we will clone the task for and relate the new tasks to.
Best practice tip: Provide a description so you and other/future admins know what this flow element is used for.
Configure as follows:
- Screen Properties:
- Configure Frame: deselect Header
- Control Navigation: deselect Pause and Previous
- Add a Lookup Component Text:
- API Name: Account1
- Field API Name: AccountId
- Label: Account 1:
- Object API Name: Case
- Add a Lookup Component Text:
- API Name: Account2
- Field API Name: AccountId
- Label: Account 2:
- Object API Name: Case
- Component Visibility: {!Account1.recordId} is null {!GlobalConstant.False} [This field will only show if the account 1 field has a value]
- Add a Lookup Component Text:
- API Name: Account3
- Field API Name: AccountId
- Label: Account 3:
- Object API Name: Case
- Component Visibility: {!Account2.recordId} is null {!GlobalConstant.False} [This field will only show if the account 2 field has a value]
- Add a Lookup Component Text:
- API Name: Account4
- Field API Name: AccountId
- Label: Account 4:
- Object API Name: Case
- Component Visibility: {!Account3.recordId} is null {!GlobalConstant.False} [This field will only show if the account 3 field has a value]
- Add a Lookup Component Text:
-
- API Name: Account5
- Field API Name: AccountId
- Label: Account 5:
- Object API Name: Case
- Component Visibility: {!Account4.recordId} is null {!GlobalConstant.False} [This field will only show if the account 4 field has a value]
-
 View image full screen
E. Next, we will add an Assignment flow element called Add to the Collection where we will add the selected accounts (up to 5) to the AccountCollection collection variable.
Best practice tip: Provide a description so you and other/future admins know what this flow element is used for.
Configure as follows:
- {!AccountCollection} Add {!Account1.recordId}
- {!AccountCollection} Add {!Account2.recordId}
- {!AccountCollection} Add {!Account3.recordId}
- {!AccountCollection} Add {!Account4.recordId}
- {!AccountCollection} Add {!Account5.recordId}

F. Configure a Get Records flow element called Get Task Info to get the values for the original task. This will be used for cloning purposes. You will look for the task Id where it matches recordId. The task Id will be passed in the recordId variable in the button. We will detail that out in the button creation step.
Best practice tip: Provide a description so you and other/future admins know what this flow element is used for.
Configure as follows:
- Object: Task
- Condition Requirements: Id Equals recordId
- How Many Records to Store: Only the first record
- How to Store Record Data: Automatically store all fields

F. Now, we will bring all the account records in our AccountCollection from the Step E. Assignment into a loop. So, we need a Loop flow element.
Best practice tip: Provide a description so you and other/future admins know what this flow element is used for.
Configure to match the below:
- Collection Variable: {!AccountCollection}

G. Next, create a Decision flow element called Loop Record Have a Value? The CSR can select up to 5 accounts to clone the task for. We need to account for the fact that they may select less than 5. If the CSR selected an account for the lookup, that lookup would have a value. If they left it blank the loop record would be blank. We can’t create tasks for records that do not exist.
Best practice tip: Provide a description so you and other/future admins know what this flow element is used for.
Configure to match the below:
- Outcome: Has Value
- {!Loop} Does Not Equal
- Default Outcome: No Value

H. We need an Assignment flow element called Assign Values From the Original Task assign the values of the varNewTask variable using the values from the original task – Step F. We’re setting the stage for the cloning of the task.
Best practice tip: Provide a description so you and other/future admins know what this flow element is used for.
Configure to match the below:
- {!varNewTask.WhatId} Equals {!Loop}
- {!varNewTask.Subject} Equals {!Get_Task_Info.Subject}
- {!varNewTask.WhoId} Equals {!Get_Task_Info.WhoId}
- {!varNewTask.ActivityDate} Equals {!Get_Task_Info.ActivityDate}
- {!varNewTask.Status} Equals {!Get_Task_Info.Status}
- {!varNewTask.Priority} Equals {!Get_Task_Info.Priority}

I. We need one more Assignment flow element. We are going to call this Add Record to Collection and here, we will add the variable varNewTask into the TaskRecordsToBeCreatedCollection collection variable. All the task records in this collection will be created once outside of the loop.
Best practice tip: Provide a description so you and other/future admins know what this flow element is used for.
Configure to match the below:
- {!TaskRecordsToBeCreatedCollection} Add {!varNewTask} [Note: This does read backwards as you are adding varNewTask into the TaskRecordsToBeCreatedCollection collection variable and not the other way around. Oh Salesforce!)

J. Now that we are done with the loop, we need the Create Records flow element called Create Task Records. In this step, we are creating the task records that are in the TaskRecordsToBeCreatedCollection collection variable.
Best practice tip: Provide a description so you and other/future admins know what this flow element is used for.
Configure to match the below:
- How Many Records to Create: Multiple
- Record Collection: {!TaskRecordsToBeCreatedCollection}
 View image full screen
K. Lastly, we have a final screen flow element to show the links to the selected accounts and a link back to the original task. To create a link to the record page, you click on the hyperlink icon ![]() and enter “/{!<insert your recordId link>}.
and enter “/{!<insert your recordId link>}.
Best practice tip: Provide a description so you and other/future admins know what this flow element is used for.
Configure as follows:
- Screen Properties:
- Configure Frame: deselect Header and Footer
- Add a Display Text Component
- API Name: ConfirmText
-
Text
You created a task for the following accounts:
{!Account1.recordName} [Link: /{!Account1.recordId}]
{!Account2.recordName} [Link: /{!Account1.recordId}]
{!Account3.recordName} [Link: /{!Account1.recordId}]
{!Account4.recordName} [Link: /{!Account1.recordId}]
{!Account5.recordName} [Link: /{!Account1.recordId}]
Return to the task. [Link: /{!recordId}]
 View image full screen
L. Now, we need to connect the flow elements to match the screenshot below.

M. Debug the flow to ensure it is working as expected.
N. Save your flow. Let’s call it Clone a Task for Multiple Accounts.
Best practice tip: Provide a description so you and other/future admins know what this flow is for.

O. Activate the flow.
P. Create a button. You are not using a quick action since you can’t pass the recordId into the screen flow. That’s why we need the button to call the flow and pass the Task Id into the recordid variable.
Best practice tip: Provide a description so you and other/future admins know what this button is for.
Configure it to match the below:
- Label: Add Multiple Accounts
- Behavior: Display in new window
- Display Type: Detail Page Button
- Button or Link URL: /flow/Clone_a_Task_for_Multiple_Accounts?recordId={!Task.id}

Q. Add the button to the Task page layout.
Now, before you deploy the changes to Production, don’t forget to test the rest of your configuration changes.
- Access the screen flow from the Add Multiple Accounts button on the task page layout.
- Select 1 or up to 5 accounts. Click Next.
- Click on the account or task link to confirm they are working as expected.
- Verify the tasks were created for the accounts, as expected.
Deployment Notes/Tips:
- Flow, button and page layout can be deployed to Production in a change set (or can be deployed using a tool such as Metazoa’s Snapshot).
- You will find the flow in a change set under the Flow Definition component type.
- Activate the flow post deployment as flows deploy inactive in Production, unless you have opted in on the Process Automation Settings screen, to “Deploy processes and flows as active.” NOTE: With this change, in order to successfully deploy a process or flow, your org’s Apex tests must cover at least 75% of the total number of active processes and active autolaunched flows in your org or you can select 0%, which will run the apex classes not related to your flow.
April 20, 2021 at 05:30PM
Click here for more details...
=============================
The original post is available in Jenwlee's Salesforce Blog by jenwlee
this post has been published as it is through automation. Automation script brings all the top bloggers post under a single umbrella.
The purpose of this blog, Follow the top Salesforce bloggers and collect all blogs in a single place through automation.
============================
Post a Comment