Freeze a User – Now or in the Future : jenwlee
by: jenwlee
blow post content copied from Jenwlee's Salesforce Blog
click here to view original post

As someone who performs user administrative tasks, you may need to freeze a user right away. Or you may be aware of a user’s upcoming departure date. Rather than having to remember to freeze them later, wouldn’t it be great if you can schedule the user’s freeze date/time? Or, what if you can lookup the user and select to freeze them now in less clicks?
Yes! This is all doable with two custom fields, a screen flow, a record-triggered flow and adding the screen flow to a lightning app page.
Here are a few lessons learned from implementing this use case:
- Create a screen flow using the standard lookup component.
- Create a record-triggered flow with a scheduled path.
Business Use Case: Addison Dogster is the system administrator at Universal Containers. Mary Markle is the IT manager. Mary has staff who manage users in Salesforce, but are not true system administrators. She wants the ability for her staff to be able to select a user and their freeze date/time in minimal clicks. Her staff can freeze users right away or can schedule a future freeze date.
Solution: Addison Dogster knows the Freeze button is shown on a user record but had investigate what determines whether a user can be frozen or is frozen. She learned that the IsFrozen user attribute is stored in the User Login object. Being the #AwesomeAdmin that she is and a true Flownatic, Addison, of course, turns to flow for the automation solution.
With a screen flow, she prompts the user to select the user and the freeze date/time and updates the user record with the freeze date/time.
With a record-triggered flow using a scheduled path, Salesforce freezes the user per the user’s freeze date/time.
Here is a demo of the solution:

The automation solution (screen flow) looks like this:
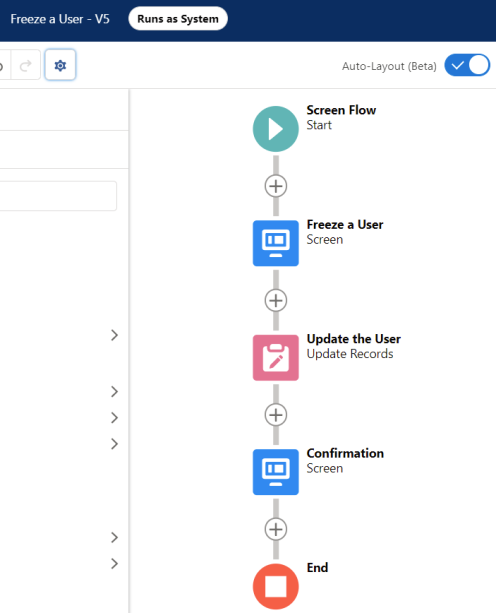
(1) The screen flow prompts the user for the user via lookup search and the freeze date/time (set to now by default) (2) Then, we update the freeze date/time field for the selected user’s user record. (3) Lastly, we show a confirmation message that notes the “<Selected User’s Name> will be frozen on <Freeze Date/Time>.”
The automation solution (record-triggered flow) looks like this:

This flow fires when a user record is updated after the record is saved when the freeze date/time has a value and the User can be frozen field is true. Then, when the time equals the Freeze Date/Time, Salesforce will update the IsFrozen attribute to true for the User Login record.
Highlighted Steps:
Note: The user implementing this should be a system administrator or have Manage Users permission to be able to update the user.
1. In the User object, create two new custom fields.
First, create a Date/Time custom field called Freeze Date/Time. Grant Read/Edit FLS to the field.
Best practice tip: Provide a description so you and other/future admins know what this field is used for.

Second, create a Formula (checkbox) custom field called User can be frozen. If the freeze time is greater than or equal to now, set the checkbox to true. Otherwise, it is set to false.
Best practice tip: Provide a description so you and other/future admins know what this field is used for.
Formula: If ( Freeze_Date_Time__c <= now(), true, false)

2. Create the Screen Flow Lookup custom object from the Blog Post: Trick: Running User Must Have Create Permission to Field Used in Screen Flow Lookup Component.
3. Create the screen flow shown above. In Lightning Experience, it is found under Process Automation | Flows. Click on “New Flow.” Select Screen Flow.
In the flow, we would configure the following flow resources.
A. We need to create a formula resource to set the date/time to now.
Best practice tip: Provide a description so you and other/future admins know what this flow resource is used for.
This is how that flow resource would be configured.
- Resource Type: Formula
- API Name: NowFormula
- Data Type: Date/Time
- Formula: Now() — This sets the date/time to now.

B. First, we configure a Screen flow element called Freeze a User to collect the user to freeze and set the freeze date/time.
Best practice tip: Provide a description so you and other/future admins know what this flow element is used for.
Configure as follows:
- Screen Properties:
- Control Navigation: deselect Pause and Previous
- Add a Lookup Component:
- API Name: UserLookup
- Field API Name: CreatedById
- Label: User
- Object API Name: Screen_Flow_Lookup__c
- Required: {!GlobalConstant.True}

- Add a Date & Time Component:
- Label: Freeze Date/Time
- API Name: Freeze_Date_Time
- Required: Check
- Default Value: {!NowFormula}

C. Next, we will add a Update Records flow element called Update the User where we will update the provided Freeze Date/Time for the selected user’s user record.
Best practice tip: Provide a description so you and other/future admins know what this flow element is used for.
Configure as follows:
- How to Find Records to Update and Set Their Values: Specify conditions to identify records and set fields individually
- Object: User
- Filter User Records: Condition Requirements to Update Records: All Conditions Are Met (AND)
- Id Equals {!UserLookup.recordId} (Id that equals to the selected user’s user id)
- Set Field Values for the User Records:
- Freeze_Date_Time__c {!Freeze_Date_Time}

D. Lastly, we have a final screen flow element called Confirmation to show a confirmation message “<Selected User’s Name> will be frozen on <Freeze Date/Time>.”
Best practice tip: Provide a description so you and other/future admins know what this flow element is used for.
Configure as follows:
- Screen Properties:
- Configure Frame: Deselect Show Footer
- Control Navigation: Deselect Previous and Pause
- Add a Display Text Component
- API Name: ConfirmationText
- Text
{!UserLookup.recordName} will be frozen on {!Freeze_Date_Time}.
 View image full screen
E. Toggle on Auto-Layout.

F. Debug the flow to ensure it is working as expected.
G. Save your flow. Let’s call it Freeze a User. Set the How to Run the Flow to System Context With Sharing — Enforces Record-Level Access.
Best practice tip: Provide a description so you and other/future admins know what this flow is for.

H. Activate the flow.
4. Open Lightning App Builder, create an app record page called Freeze a User. Make this a one column page and add the flow component called Freeze a User screen flow.
5. Create a custom tab for the Freeze a User app page.
6. Create the record-triggered flow shown above. In Lightning Experience, it is found under Process Automation | Flows. Click on “New Flow.” Select Record-Triggered Flow.
In the flow, we would configure the following flow resources.
A. Configure the Start flow element.
- Trigger: A record is updated
- Run Flow: After the record is saved
- Object: User
- Condition Requirements: All Conditions Are Met (AND)
- Freeze_Date_Time__c Is Null {!$GlobalConstant.False}
- User_can_be_frozen__c Equals {!$GlobalConstant.True}
- When to Run the Flow for Updated Records: Only when a record is updated to meet the condition requirements

- Scheduled Paths:
- Freeze Time:
- Path Label: Freeze Time
- API Name: Freeze_Time
- Time Source: User: Freeze Date/Time
- Offset Number: 0
- Offset Options: Hours After
- Freeze Time:

B. Configure a Update Records flow element called Freeze User to update the User Login record where the UserId Equals the recordId, update the IsFrozen to true.
Best practice tip: Provide a description so you and other/future admins know what this flow element is used for.
Configure as follows:
- Object: User Login
- Condition Requirements to Update Records: All Conditions Are Met (AND)
- UserId Equals {!$Record.Id}
-
Set Field Values for the User Login Records:
- Is Frozen: {!$GlobalConstant.True}

C. Toggle on Auto-Layout.

D. Save your flow. Let’s call it Freeze the User.
Best practice tip: Provide a description so you and other/future admins know what this flow is for.

F. Activate the flow.
Test your automation before production deployment.
- On the Freeze a User app page, select a user and leave the freeze date/time to the default (i.e. now).
- Navigate to the user record and confirm that the Unfreeze button is shown on the user record. Verify that the Freeze Date/Time is updated and the User can be frozen? field is set to true.
- Back on the Freeze a User app page, select a user and update the freeze date/time to a date/time in the future.
- Navigate to the user record and confirm that the Freeze button is shown on the user record. Verify that the Freeze Date/Time is updated and the User can be frozen? field is set to false.
- At the selected freeze date/time, navigate to the user record and confirm that the Unfreeze button is shown on the user record. Verify that the User can be frozen? field is set to true.
Deployment Notes/Tips:
- The flows and related components can be deployed to Production in a change set (or can be deployed using a tool such as Metazoa’s Snapshot).
- You will find the flows in a change set under the Flow Definition component type.
- Activate the flow post deployment as flows deploy inactive in Production, unless you have opted in on the Process Automation Settings screen, to “Deploy processes and flows as active.” NOTE: With this change, in order to successfully deploy a process or flow, your org’s Apex tests must cover at least 75% of the total number of active processes and active autolaunched flows in your org or you can select 0%, which will run the apex classes not related to your flow.
June 07, 2021 at 05:30PM
Click here for more details...
=============================
The original post is available in Jenwlee's Salesforce Blog by jenwlee
this post has been published as it is through automation. Automation script brings all the top bloggers post under a single umbrella.
The purpose of this blog, Follow the top Salesforce bloggers and collect all blogs in a single place through automation.
============================
Post a Comment