Salesforce Campaign Management : jayakrishnasfdc
by: jayakrishnasfdc
blow post content copied from Jayakrishna Ganjikunta
click here to view original post

Welcome to jayakrishnasfdc blog, in this article I am explaining the complete background of the Campaign and journey to Contact, Lead, and Opportunity. Let’s see the whole content as an index first to understand what are we going to read.
- Salesforce Campaign
- What is Campaign
- How to create a Campaign
- Campaign Metrics
- Campaign Hierarchy
- Salesforce Campaign Members
- Campaign Member
- Campaign Member status
- Default Checkbox
- Lead and Contact Campaign History
- Campaign Influence
- Link Opportunities to Salesforce Campaigns
- Linking Opportunities by Converting Leads
- Creating an Opportunity on a Contact
- Add Leads and Contacts to Campaigns
- Campaign Reporting
Salesforce Campaign
A Salesforce Campaign is a group of Leads and Contacts exposed to specific marketing communication(s). It stores essential performance metrics and means salespeople can quickly see the customers and prospects that received marketing activity.
In other words ” Its a specific Marketing activity or series of activities that seeks to promote a product or service”.

Things you can do with Campaigns in Salesforce are:
- Measure how marketing campaigns are doing.
- Let salespeople see the history of marketing messages sent to customers and prospects.
- Understand which Leads and Contacts have responded to emails and other marketing communications.
- Summarize campaign results and make them easy to understand.
- Let salespeople quickly add Leads and Contacts to upcoming events, webinars, and other campaigns.

The flow to show where the Campaign comes in sales Lifecycle..

How to create a Campaign in Salesforce
To create a Salesforce Campaign, click on the Campaigns tab. On the right, click New.

However, if you don’t have permission to do this, you need the Marketing User checkbox set to True.
You find this feature on the User record.

Ask your system administrator to edit your User record and set this checkbox to True.
There are some changes you might want to make to the Campaign object and page layout.
For example, modify the Type field to reflect the marketing activities your business runs.

- From the Campaigns tab, click New.
- Enter a name for the campaign.
- Select a campaign type, such as advertisement, email, webinar, conference, and so forth.
- Select a status for the campaign.
- For now, enter an estimate for Budgeted Cost and Expected Revenue.
- Enter a description.
- Click Save.

Campaign Metrics
- Total Members. The total number of Leads and Contacts linked with the Campaign.
- Responses in Campaign. This number is critical. It shows how many people acted in the way we wanted after receiving the marketing communication.
- Opportunities in Campaign. The number of opportunities linking to this marketing activity.
- Value Opportunities in Campaign. The dollar value of opportunities related to the Campaign.
- Won Opportunities in Campaign. The number of Closed Won opportunities linking to the Campaign.
- Value Won Opportunities in Campaign. The value of these Closed Won opportunities.

Campaign Hierarchies
There are a few different ways hierarchies can be applied to a business’s marketing practices. A common approach is to use the hierarchy to group campaigns by marketing strategy. The hierarchy can have as many as five levels, but three levels works well for many companies. The top level can represent an overall strategic focus, such as selling a new product in a company’s lineup, or building brand awareness.
The second level can be for the different aspects of that focus, like the product launch, getting feedback from purchasers, or upselling previous customers. Finally, the third level can represent individual marketing efforts, like an email, an online ad, invitations to demos, or the demo itself.


Salesforce Campaign Members
Campaign Member
A Campaign Member describes the relationship between an individual Lead or Contact and a specific Salesforce Campaign. It tracks the change in this relationship over time, and it’s critical for building useful marketing reports and dashboards in Salesforce.
people do different things to “respond” to each type of marketing activity. The response depends on the nature of the campaign.

Different ways to create Campaign Member
- Add a lead, contact, or person account individually from their record detail page.
- Add one or more members by clicking Manage Campaign Members from the dropdown menu on the Campaign Members related list.

- Add one or more leads by clicking Add Leads from a campaign’s Campaign Member related list.
- Add contacts from an account by clicking Add Contacts in the Campaign Members related list on a campaign and searching for the account name.
- Add members from the Contacts related list on an account detail page.
- Add members from a lead, contact, or person account list view.
- Add members from lead or contact report results.
- Import or add existing leads, contacts, and person accounts to a campaign with the Data Import Wizard.
Campaign Member Status
To add campaign member statuses to a campaign,
- On the campaign detail page, click New in the Campaign Member Statuses related list.
- Enter a name for the status.
- If you’d like the status to show that your prospect has replied to the campaign, click the Responded option and then click Save.
Take a look at this table. The left-hand column lists the Campaign Member Status values for the webinar.
The right-hand column shows the status values that count as Responded.

In this example, the Responded total on the Campaign includes Leads and Contacts with a status of Registered, Attended, or No Show.
In other words, we count anyone that registers as Responded. It doesn’t matter whether they later attend the webinar or not.
Are we right to do that? After all, it means the figure includes people failing to attend the webinar.
The short answer is that it’s up to you. We chose to include all three status values because they responded positively to the invite email, i.e., they registered for the webinar.

To Modify Campaign Member status , click on View all on Campaign members related list and Click on Edit.

Default Checkbox
You can set one status value as the default. The default is the value to which Leads and Contacts are assigned when they first get added to the Campaign. That is unless you specify another value.

Often, you can set the default as ‘Not Sent.’ When adding Leads and Contacts to the Campaign, they are automatically assigned the Not Sent value.
Lead and Contact Campaign History
Naturally, one Lead or Contact can link to more than one Campaign over time.
You may even have a Lead or Contact linking to several Campaigns at the same time. And, of course, they can have a different Member Status for each Campaign.
Here’s how that looks:

A separate Campaign Member record describes the relationship between a Lead or Contact and each Salesforce campaign.
In our case, we include the Responded checkbox on the page. This checkbox means salespeople can quickly see whether the person responded to the marketing campaign.
Link Opportunities to Salesforce Campaigns
Salesforce Campaign Influence is how Salesforce Opportunities are associated with the Campaigns that helped generate them. It’s all about joining the dots between sales revenue (stored in opportunities) and marketing data (stored in campaigns) – and therefore, is the fundamental connection in measuring Marketing ROI (return on investment).

What is Campaign Influence in Salesforce?
Salesforce Campaign Influence is how Salesforce Opportunities are associated with the Campaigns that helped generate them.
Campaign Influence can be a daunting topic, however, for marketers and admins who aren’t familiar with the nuts and bolts of Salesforce Sales Cloud, Salesforce Campaigns functionality, and the Campaign Influence object.
Failing to understand the two options that the Salesforce platform provides is a common roadblock.
The dream of accurate, effortless ROI tracking can become real. To begin demystifying Campaign Influence in Salesforce, we can start by laying out the two types:
- Campaign Influence 1.0 (AKA Salesforce Influence Model) – the default attribution model, using the “Primary Campaign Source Field”
- Customizable Campaign Influence – for more advanced, multi-touch attribution.
Key Salesforce Marketing Terms to Learn
Before you can understand how Campaign Influence works (without getting lost!) there are terms you need to familiarize yourself with:
- Contact roles: the contact involved in the opportunity is that all-important link. Salesforce will only pick up the contact’s involvement when the contact is added as a Contact Role to the opportunity. A Contact Role record allows you to show that this contact is playing an influencing role in that opportunity. Read more detail in this Contact Role guide.
- Salesforce Campaigns
- Campaign Members
- Lead conversion: when Leads are considered “qualified” by your organization, the Lead record is converted to create a new Contact, create/relate to an Account, and (optionally) create an Opportunity. Understanding this concept will make many of the automed Campaign Influence behaviors clearer.
Salesforce Campaign Influence 1.0 (Option 1)
As the default attribution model, it’s the simplest to grasp. With the advances in marketing analytics and increased expectations of what can be reported on with Salesforce, many organizations will find this type of Salesforce Campaign Influence insufficient. With this model, you can:
- Associate Campaigns to Opportunities, using the contact as the golden link.
- Enable/Disable as you wish
- Set an auto-association timeframe
- Credit revenue to campaigns in a simple way, using the “Primary Campaign Source” field.
How Salesforce Campaign Influence 1.0 Works
A picture can speak a thousand words, so I’m going to use the Salesforce data schema to help us discover the Primary Campaign Source field. The data schema is a diagram that shows how Salesforce objects are related, and is available in every Salesforce org (in “Setup”).
Highlighted in yellow, you can see Primary Campaign Source is a field on the Opportunity (type, “lookup”). The field “looks up” to the Campaign, therefore linking the two together.

You can see the relationship more clearly here:
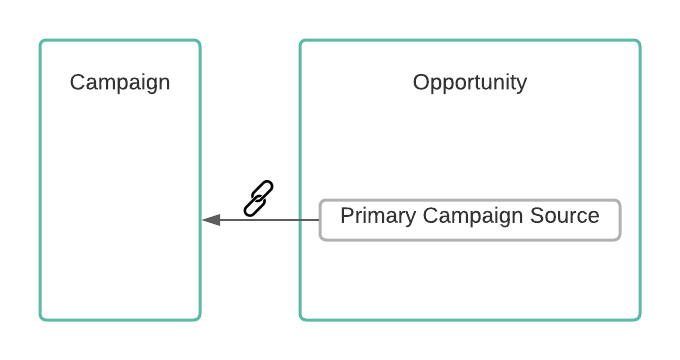
Only one Campaign can be added to the Primary Campaign Source for each Opportunity (the nature of lookup relationship fields).
Crediting revenue to Campaign is kept simple for this reason. The campaign on the opportunity ‘Primary Campaign Source’ field will receive 100% of the credit.

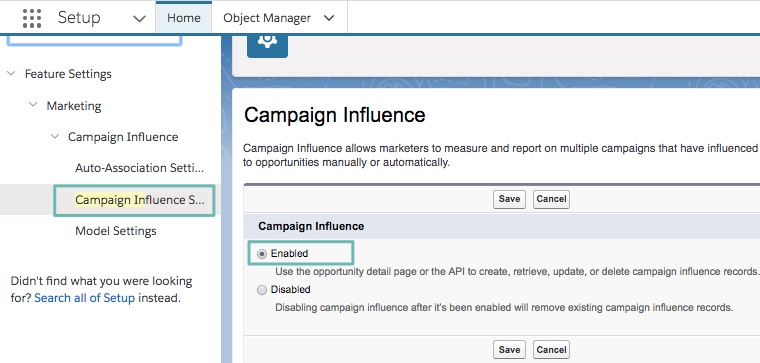
Enable Campaign Influence 1.0
You can enable/disable the Campaign Influence feature as you wish. In Setup, search for ‘Campaign Influence’, and select ‘Enabled’.
Auto-association
Auto-association means that you can let Salesforce take care of forging the link between your Opportunities and Campaigns.
When a Lead is converted and an opportunity created at the time of conversion (which remember, is optional), then auto-association will kick into action.
Auto-association can be broken down into two parts:
- Time-based Auto-association
- Auto-association rules
Time-based Auto-association
Based on the time period that has passed between the “influential” marketing campaign, and the won revenue.
Campaign Influence is a subjective topic, swayed by a number of factors. Time can be used as a determining factor.
If an opportunity is launched in the timeframe of a marketing campaign, we could assume that the Campaign influenced the Opportunity. For example, a Campaign that the contact engaged with 30 days ago (or less) is influential, as opposed to one they engaged with over a year ago (as we can assume there would be other influences that pushed the deal “over the line”).
The tricky part comes when we have to set those time periods; how long after a campaign launch can marketing still influence new opportunities? (think: ‘how long is a piece of string?’). The allowable time lag will be different for every business, and should be discussed as a team.
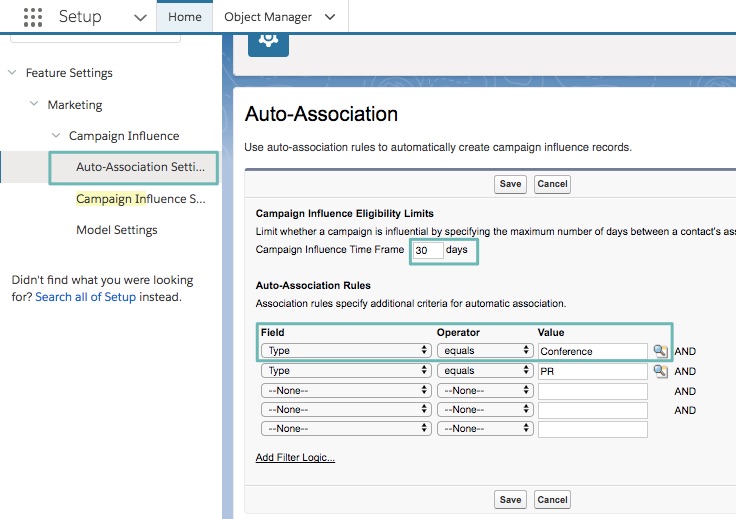
Auto-association rules
On top of time-based auto-association, you can set filters to only include Campaigns with certain criteria, for example, one specific “type” (or any Campaign Object field). As a result, you can also exclude certain campaigns that will not have auto-association applied.
The rest can be linked manually by yourself, or another user with sufficient user permissions.
Customizable Campaign Influence (Option 2)
Customizable Campaign Influence supports more complex influence scenarios (when things aren’t so “black and white”) and provides more flexibility. If your marketing team is seeking multi-touch attribution, then they certainly outgrown the Salesforce Influence model.
- Associate Campaigns to Opportunities, using the Contact Role as the golden link.
- Associate multiple Campaigns to an Opportunity – and multiple Opportunities to a Campaign.
- How the Opportunity’s amount is shared between Campaigns (revenue share) reflects the level of influence each Campaign has relative to the others.
- Attribution models determine the revenue share. Think of these as different views to weight Campaign Influence in different ways (more on this later).
As you can already see, Customizable Campaign Influence goes beyond the ‘all or nothing’ revenue share in Campaign Influence 1.0.
How Salesforce Customizable Campaign Influence Works
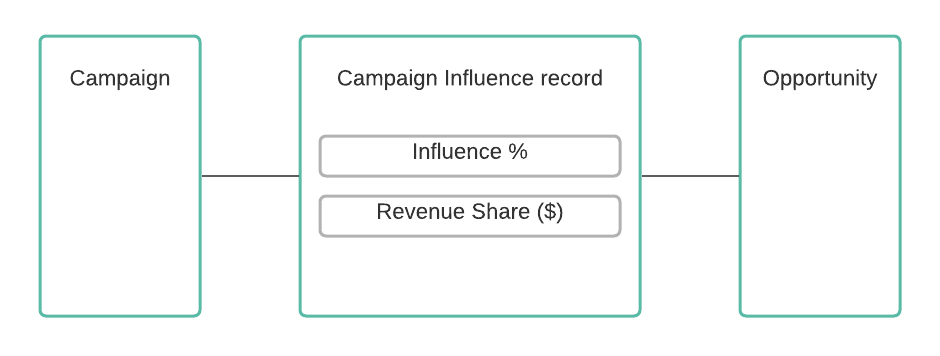
With Customizable Campaign Influence the Opportunity’s amount is shared/split between Campaigns (revenue share) reflects the level of influence each Campaign has relative to the others.
You need to keep in mind two essential concepts:
- The Influence (%)
- The Revenue Share (Influence % of Opportunity Amount)
Example:
- Opportunity X which has the amount £10,000.
- Campaign A is said to have had a great influence on Opportunity X, pushing it over the line. You want to credit 50% influence to Campaign A. Campaign A’s revenue share is £5,000.
- Campaign B, on the other hand, did play a part but not to the same extent as Campaign A, therefore, you attribute 25% to Campaign B, a revenue share of £2,500.
This is how it looks from the “Influenced Opportunities” related list from the Campaign’s view:

Salesforce Attribution Models
‘Attribution models’ describe how each touchpoint (Campaign) is weighted (% influence) when associated with Opportunities.
While they sound daunting, understanding how they work doesn’t have to be complicated!
In this guide, I will quickly cover the three most common attribution models (which come out-of-the-box with Salesforce). You can read more about attribution models in: ‘Pardot Analytics Update: Campaign Influence Attribution Models Explained‘.
- First-touch: focuses credit (opportunity revenue) on the campaign (touch point) that moved prospects through the awareness stage.
- Last-touch: focuses credit (opportunity revenue) to the campaign (touch point) that moved prospects through the consideration/negotiation stage.
- Even Distribution: gives equal credit to all the campaigns (touch points) that a prospect interacted with during the buying cycle.
With Customizable Campaign Influence, you can define the weightings for the first-touch campaign, last-touch, or stick to an even distribution model (where all campaigns have equal % influence, and therefore revenue share).
After enabling Campaign Influence in Salesforce Setup, you must then click “Edit” again, and enable “Additional Campaign Influence Models”:
Then, “Model Settings” will appear in the Setup menu, listing all the attribution models available to you (out-of-the-box):
Default Attribution Model
Salesforce requests you choose a default model, represented by a checkbox on the “Model Settings” page.
The default attribution model will be represented when Campaign Influence is displayed on Salesforce page layouts. Related lists, such as “Influenced Campaigns” on Opportunities will show Even distribution (you can access other models through reporting, which we will see shortly).
Here, I’ve decided to make “Even distribution” the default model to use across my organization:

How Salesforce Crunches the Numbers
Let’s remind ourselves of how Contacts are associated with Campaigns.
As you can see in the image below, a Contact (or Lead) record is associated with a Campaign by creating a Campaign Member record. Campaign Members are a “Junction Object”, a separate record that connects the Contact and Campaign, representing the Contact’s engagement with that specific Campaign.
Now, let’s focus on one contact. This individual is a member of three campaigns (therefore has 3 Campaign Member records). Each Campaign Member record has a ‘Created Date’ field, and a ‘Last Modified’ Date’ field.
When calculating Campaign Influence, Salesforce uses these two date fields to determine the first and last touch:
- First-touch: Salesforce looks at Campaign Member created date to decide which campaign was a contact’s first-touch with your brand.
- Last-touch: Salesforce looks at Campaign Member last modified date to decide which campaign was a contact’s final marketing touch before closing. This is because the campaign member status would have changed most recently on this campaign member record.
You can see it reflected in the image above.
Moving on to the high-level picture. In the Salesforce dashboard below, we can see three pie charts.
Let’s start with ‘Even Touch’ on the right. This pie shows that 810k was the ‘Sum of Revenue Share’, which could be rephrased as the total amount of marketing influenced revenue (in Salesforce Opportunities).
The slices of the pie vary in size according to the value of the contacts that are in the campaigns (as members in Campaigns, and Contact Roles in Opportunities).
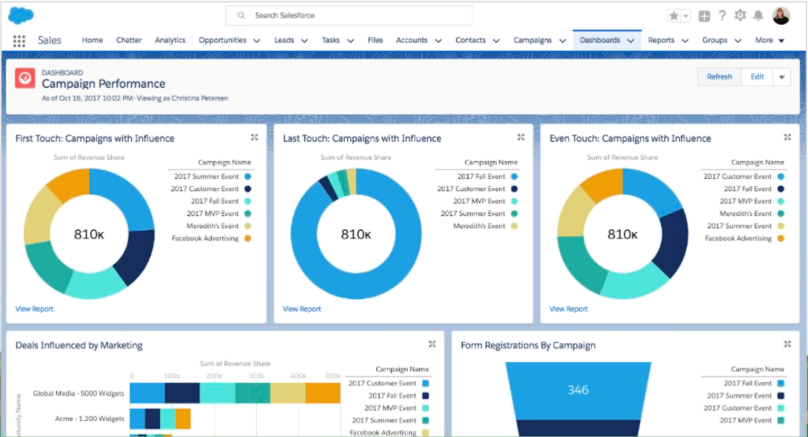
We can build on this in order to explain ‘Last Touch’. The largest slice is the bright blue, for the ‘2017 Fall Event’. We can say that this campaign made the largest contribution at the negotiation stage, right before winning the opportunity, because this is the last campaign to touch prospects before the opportunity/ies were marked closed won.
Multiple Contact Roles
What if there are two or more Contact Roles on the Opportunity? How does the “Amount” get credited between all associated Campaigns?
Campaign Influence will take every Contact Role into consideration; however, it does not divide the “Amount” field equally between all Contact Roles. Instead, it reviews all the Contact-Campaign-Member’s created/last modified dates collectively (as if they were one individual). Last touch, etc. is determined that way.
Licensing
These attribution models are available for customers that have both Salesforce and Pardot licenses. Contact your Account Executive to enable this feature if it has not yet been provisioned.
Campaign Influence Object (the Architecture)
As you know, this type of Campaign Influence means you can associate multiple Campaigns to an Opportunity – and multiple Opportunities to a Campaign.
This is possible thanks to the Campaign Influence object – one that you don’t interact with directly, but can help further solidify your understanding of Campaign Influence.
The Campaign Influence object is a “Junction Object”. Each time a Campaign-Opportunity association is made, a Campaign Influence record holds the % influence and revenue share ($) information:
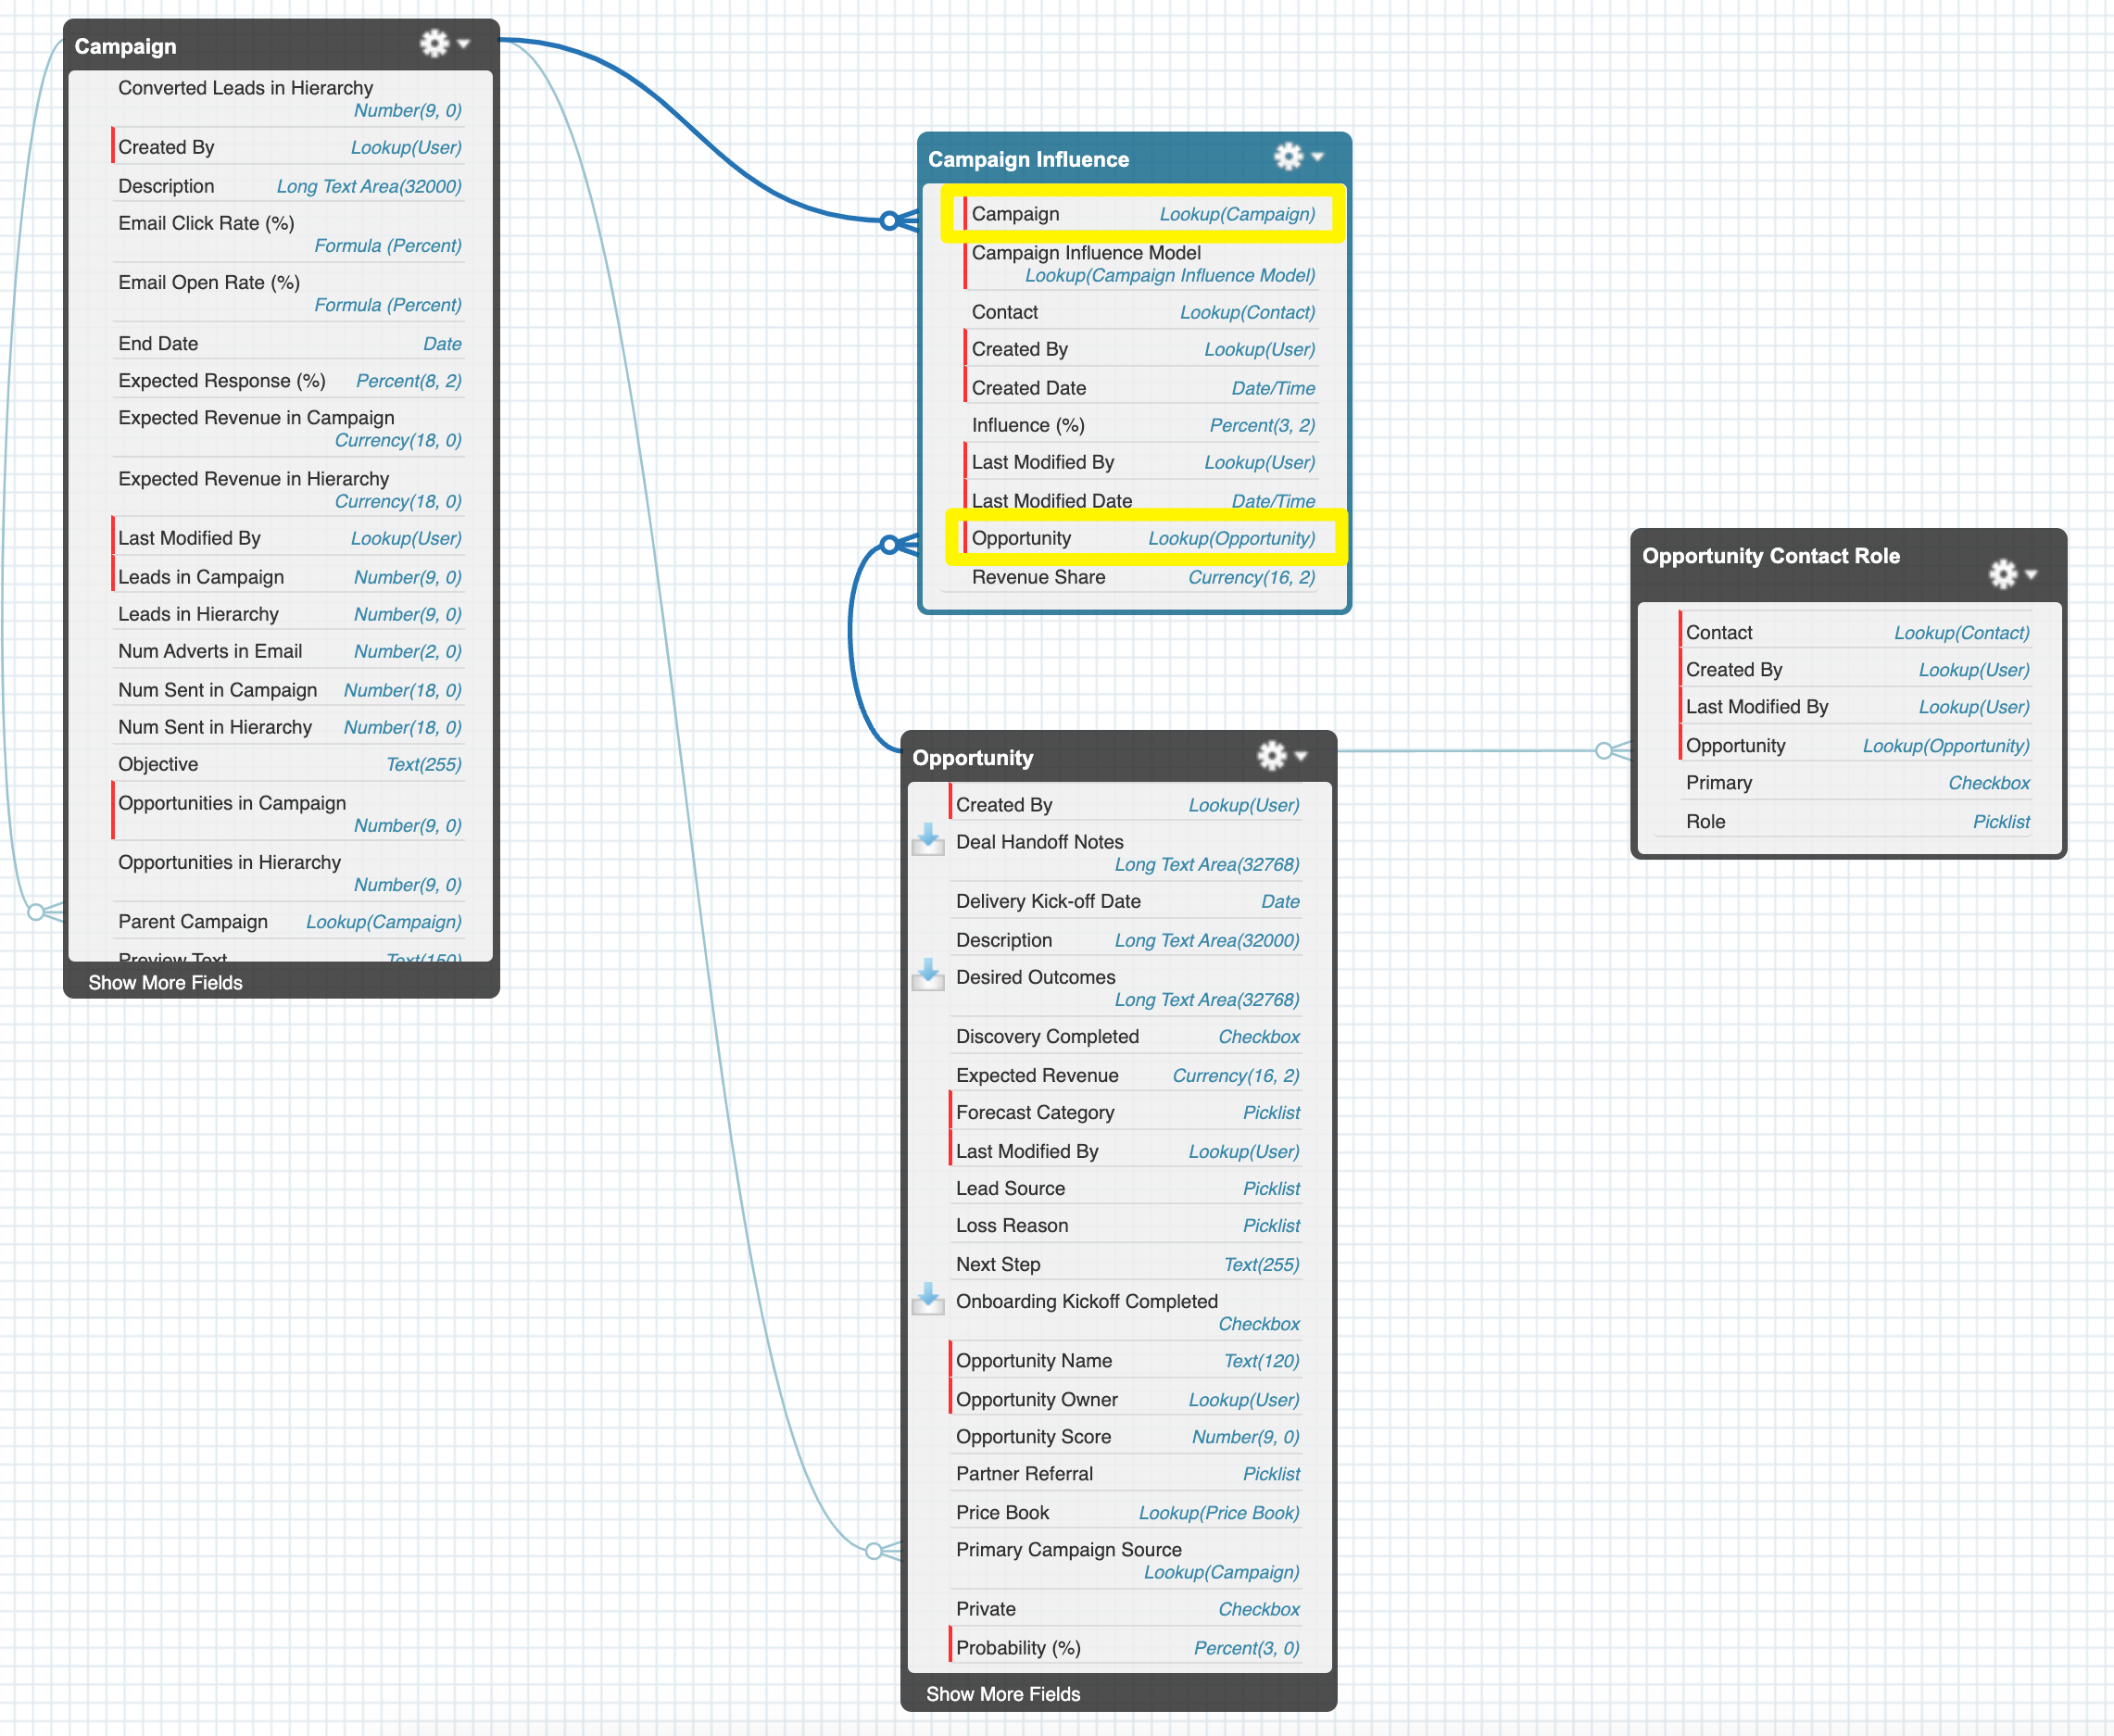
You can see the relationship more clearly here:
Primary Campaign Source vs Customizable Campaign Influence
| Primary Campaign Source | Customizable Campaign Influence |
|---|---|
| Associate one Campaign to an Opportunity, using the contact as the golden link. | Associate multiple Campaigns to multiple Opportunities (and multiple Opportunities to a Campaign) using the Contact Role as the golden link. |
| Primary Campaign Source is an Opportunity field (lookup to Campaign) | Campaign Influence is a Junction Object. |
| Credit revenue to campaigns in a simple way. The Campaign in the “Primary Campaign Source” field receives 100% of the credit. | Attribution models determine the revenue share. Think of these as different views to weight Campaign Influence in different ways. |
Campaign Influence Related Lists
To take advantage of Customizable Campaign Influence, add related lists to show the Campaign Influence breakdown at the record level. Remember, these related lists will show the default attribution model you selected in Setup, for your org:
- Influenced Opportunities: add to the Campaign object to see the Opportunities that Campaign has influenced.
- Campaign Influence: add to the Opportunity object to see the Campaigns that have influenced that Opportunity.
Campaign Influence Reports
Campaign Influence can be hard to wrap your head around – but hopefully, you’ve got to grips with the fundamentals by this stage.
You can further solidify your understanding of Campaign Influence by looking into the reports you will be using.
As you will see from the Salesforce reports in this section, you can report on Campaign Influence from different views: the whole pipeline view, from the point of view of one campaign, or from one opportunity.
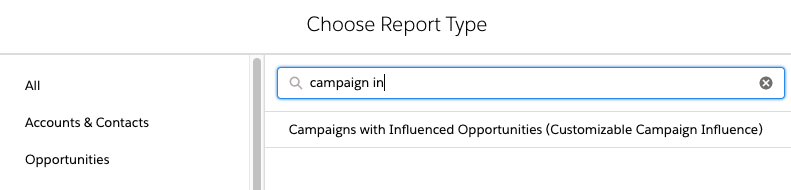
Let’s take a look at these four working examples.
To follow along, each of these examples start by creating a Salesforce report with the type ‘Campaigns with Influenced Opportunities (Customizable Campaign Influence)’.
Marketing Influenced Pipeline – All Opportunities
I am defining ‘pipeline’ here as both the open opportunities and the closed opportunities from a specific campaign. While you could argue that this is not the strict definition of pipeline (reserved only for open opportunities), that restricted view isn’t useful for marketing teams when they’re looking at campaign ROI.
In this case, I am imagining that the marketing team is going through a quarterly briefing review (but you can adjust the date filters how you wish).
Add the following filters:
- Responded: True
- Campaign Start Date: LAST QUARTER
- Opportunity type: ’New’/’New Business’. This will filter out any of the ‘renewal’ opportunities, if applicable to your business.

The ‘responded’ checkbox means that you will only include people who made a meaningful interaction with the campaign. in the case of an event, for example, you will only want to count people who attended the event (‘Responded’), vs. someone that did not make a meaningful engagement, eg. they only registered (in other words, you will filter out the no-shows). Read this post on Campaign Member Statuses to ensure you have your status values structured correctly.
Filtering by ’Start date’ will show the campaigns that were launched last quarter. As this is a relative date filter, the report will always show the start dates within the last quarter – in other words, you won’t need to update this field from one quarter to the next manually).
You will see a field ‘Model Name’ added to the report by default. This is where you can select which model you want to show (First Touch Model, Last Touch Model, Even Distribution Model, Salesforce Model). As this is an overview pipeline report, I am going to select ‘Even Distribution Model’ to ensure that all marketing touchpoints are credited, and not masked by the first or last touch campaigns.
After running the report, you will see the total value of all opportunities (pipeline influenced):

Marketing Influenced Revenue – Won Opportunities
We will stick with the same report for the next use case. The only thing you will need to add is a filter:
- Stage: ‘Closed Won’

Campaign Influenced Pipeline – All Opportunities from one Campaign
Next, we will focus in on one campaign to see which opportunities that campaign sourced, and the value of those opportunities.
Return to the report filters:
- Remove ’Stage’ and ’Start Date’,
- Add Campaign Name.

You will also need to add the filter for ‘Model Name’. Here is your chance to play around with the models depending on what you want to see:
Do you want to see the expected/won revenue from the leads (that turned converted into opportunities) that were sourced from this campaign? = use first touch.
Do you want to see the expected/won revenue of the opportunities that closed thanks to this campaign? = use last touch.
If you just want an overview of all opportunities, you can use Even Distribution.
Opportunity Campaign Influence – All Campaigns Influencing one Opportunity
Let’s flip the view from looking at which opportunities a campaign influenced, to which campaigns influenced an opportunity.
Instead of filtering by ‘Campaign name’, now we can use ‘Opportunity name’.
Don’t let me stop you there! There are many ways you can slice this report depending on who your organization uses opportunities.
View Campaign Influence Report
You will see a link on the Campaign record page that says “View Campaign Influence Report”. If you’re using Salesforce Lightning, you will be directed to the “Reports” home page (and not a report). This has been a feature leftover from Salesforce Classic, and has not been transitioned to Lightning (yes, it does still work in Salesforce Classic!)
When Campaign Influence Fails
Before we finish up this bumper guide, I wanted to share a warning with you. Even with Campaign Influence set up – plus all the bells and whistles added (related lists, reports) – without proper user adoption, your ROI reporting will be fundamentally flawed.
Campaign Influence requires discipline to gain consistent data and accurate reports as a result. This means:
- Create a Campaign for every touchpoint.
- Be consistent with Campaign Member statuses (especially the ones you consider “Responded”
- Update a Campaign Member’s status as they engage with your campaign. Pardot users – use completion actions consistently to update member status.
- Add Contact Roles to Opportunities. This guide talks through this major pain point for marketers who aren’t responsible for managing Opportunity records: 4 Ways to Create Salesforce Contact Roles (and Get Accurate Campaign Influence Reporting)
Campaign Influence
Opportunities can link to Salesforce Campaigns in two ways.
- When you convert a Lead, and,
- When you populate the Primary Campaign field as you create a new opportunity.
Linking Opportunities by Converting Leads
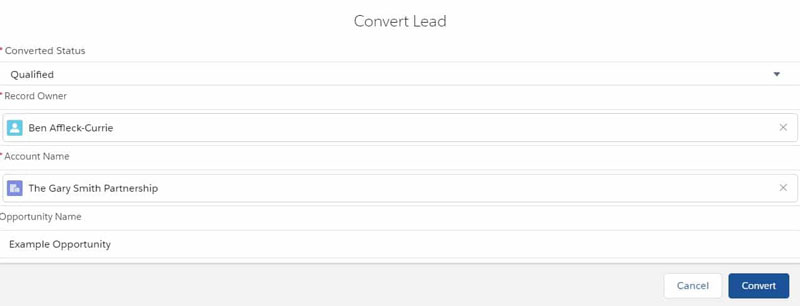

When this happens, the Opportunity links to the most recent Salesforce Campaign. It does this via the Primary Campaign field.

It doesn’t matter whether the person responded to the Campaign or not. The system assumes that the most recent Campaign is the one that led to Opportunity creation; there’s nothing you can do to change this auto-linkage.
That said, many marketing managers are disappointed. They complain that opportunities from converted Leads are not linking to Campaigns.
The Lead converts to an Account and Contact. However, the checkbox ‘Do Not Create Opportunity’ is set to True.

The salesperson then further qualifies the deal. If it looks good, she creates an Opportunity.
B. Creating an Opportunity on a Contact
The second way an Opportunity can link to a Campaign in Salesforce.
When creating an Opportunity against a Contact, the Primary Campaign field automatically populates with the most recent Campaign.
The process is the same as with Leads. It doesn’t matter whether the person responded to the Campaign.
Unfortunately, marketing managers are often still justified in complaining.
If the salesperson creates the Opportunity directly on the Account, the Primary Campaign does not populate. The field only populates if you start by creating the Opportunity on a Contact record.

Add Leads and Contacts to Campaigns
There are the four ways you can add Leads and Contacts to Salesforce Campaigns.
- Use the Add To Campaign button on a report of Leads or Contacts.
- Use the Add To Campaign button on a Lead or Contact List View.
- Add them individually using the Campaign History section of the Lead and Contact page layout.
- Import them using the Campaigns Manage Members function.
Adding Leads or Contacts to Campaigns using a report is straightforward. Simply build the report and use the Add To Campaign button.
It’s the easiest way to bulk-add people to the Campaign. You choose the Campaign and select the relevant Campaign Member Status.


the default Campaign Member value will apply if you don’t select one.
The next most straightforward method is to add records using a List View. Use the Add To Campaign button on Lead and Contact List Views


Again, you get to choose the Campaign and the Member Status value.
Sometimes it’s appropriate for salespeople and account managers to add individual Leads and Contacts to Campaigns. Do this by clicking the Add To Campaign button on the Campaign History section of the page.

And finally, you can import new records and add them using the Manage Members link on the Campaign.

And Data import wizard

Report on Campaigns
With built-in campaign reports, Margaret can easily see who her campaigns are targeting, who has responded to each campaign, and how much revenue they’re generating.
You can find the built-in campaign reports by clicking the Reports tab, then New Report, and then Campaigns from the list of report types. The Campaigns report folder contains several reports.
To see who her campaigns have targeted, Margaret can look at the Campaigns with Contacts or Campaigns with Leads reports.

The Campaigns with Contacts report lists each of your campaigns and all of the contacts associated with them.
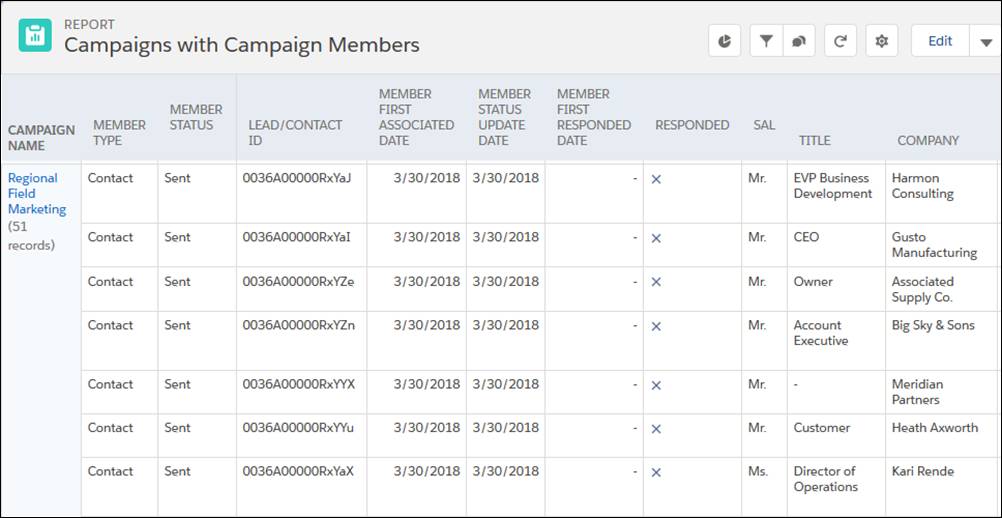
The Campaigns with Campaign Members report shows how many campaign members—including any combination of leads, contacts, and person accounts that you added to your campaigns—have responded to each campaign.
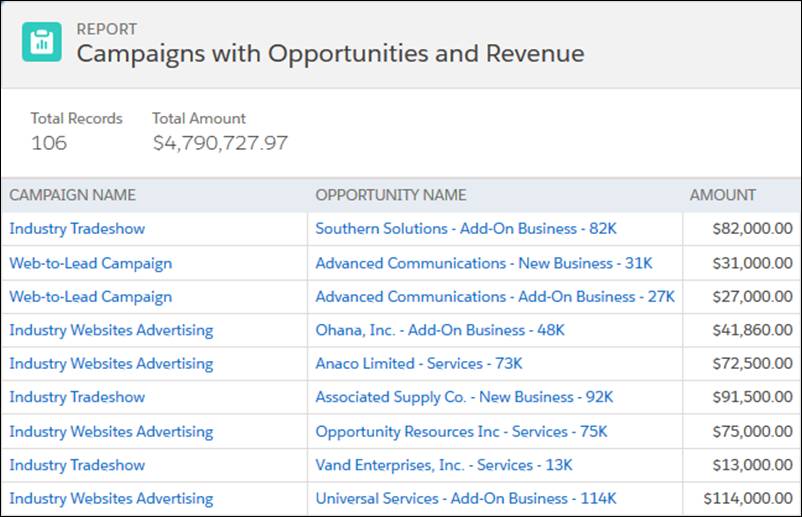
The Campaign with Opportunities report shows all the opportunities generated by your campaigns. Add the Amount field to see the revenue from each opportunity. You can filter the report to show only closed deals to focus on revenue generated, or show all deals to focus on pipeline built from your marketing efforts.
June 11, 2022 at 06:24PM
Click here for more details...
=============================
The original post is available in Jayakrishna Ganjikunta by jayakrishnasfdc
this post has been published as it is through automation. Automation script brings all the top bloggers post under a single umbrella.
The purpose of this blog, Follow the top Salesforce bloggers and collect all blogs in a single place through automation.
============================

Post a Comment