Steps for Installing Talkdesk in Salesforce Org
by: David Runciman
blow post content copied from Talkdesk
click here to view original post
Talkdesk for Salesforce offers a streamlined deployment process that allows you to integrate Talkdesk with Salesforce, add Talkdesk licenses, and assign permission sets in just a few quick steps.
Before beginning the installation process, please take a moment to confirm the following:
- Salesforce edition: You have either an Enterprise, Unlimited or Professional with API access edition of Salesforce.
- Salesforce licenses: You need to have Salesforce licenses. For more information about license requirements, please read Talkdesk for Salesforce FAQ - New Customers.
- When to install: We recommend installing Talkdesk for Salesforce after hours or during periods of lower call volume, as your agents will not be able to make or receive phone calls while Talkdesk for Salesforce is installed.
- Callbar Chrome App: If you are using Callbar Chrome App, please uninstall it first to avoid conflicting with the Callbar installation included in our Talkdesk for Salesforce package. To do this, simply type chrome://extensions into Chrome’s address bar and press Enter. Scroll down to Talkdesk Callbar and click the recycle bin to remove the extension.
When you are ready, please follow the installation and configuration steps:
- Step 1: Download Talkdesk for Salesforce
- Step 2: Designate Integration Settings
- Step 3: Review Automations
- Step 4: Add Talkdesk Users
- Step 5: Finish
Step 1: Download Talkdesk for Salesforce

- Locate the Talkdesk for Salesforce package on the Salesforce AppExchange and install it, by clicking Get It Now [1].
- Selecting Log In [2].
- Enter your login credentials for Salesforce [3].
Note: If you are already logged in to Salesforce, you will not be shown steps [2] and [3].
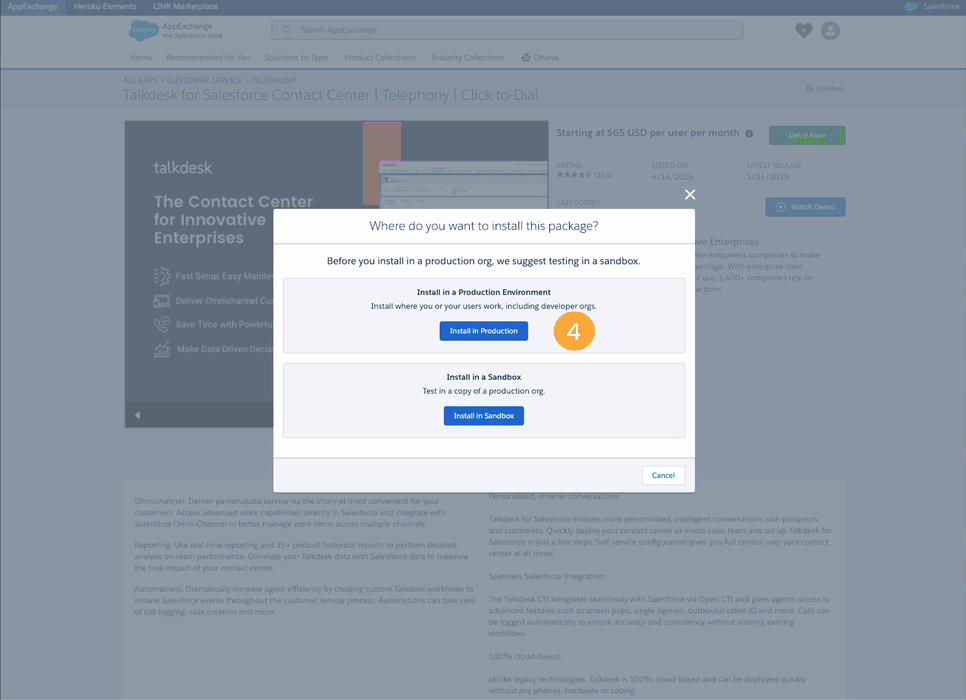
- Choose if you want to install the package in the production environment or in your sandbox account [4].
- Review the installation details and press Confirm and Install [5].
- Next, select the Salesforce profiles for which you would like to install Talkdesk for Salesforce and hit Install [6].
Note: We recommend you only install for System Administrators, as you will be able to grant specific users access to Talkdesk for Salesforce at a later step in the configuration process.
- In the pop-up window, check the box to approve third-party access for all Talkdesk websites [7]. This step ensures that Talkdesk has the necessary permissions to perform remote operations.
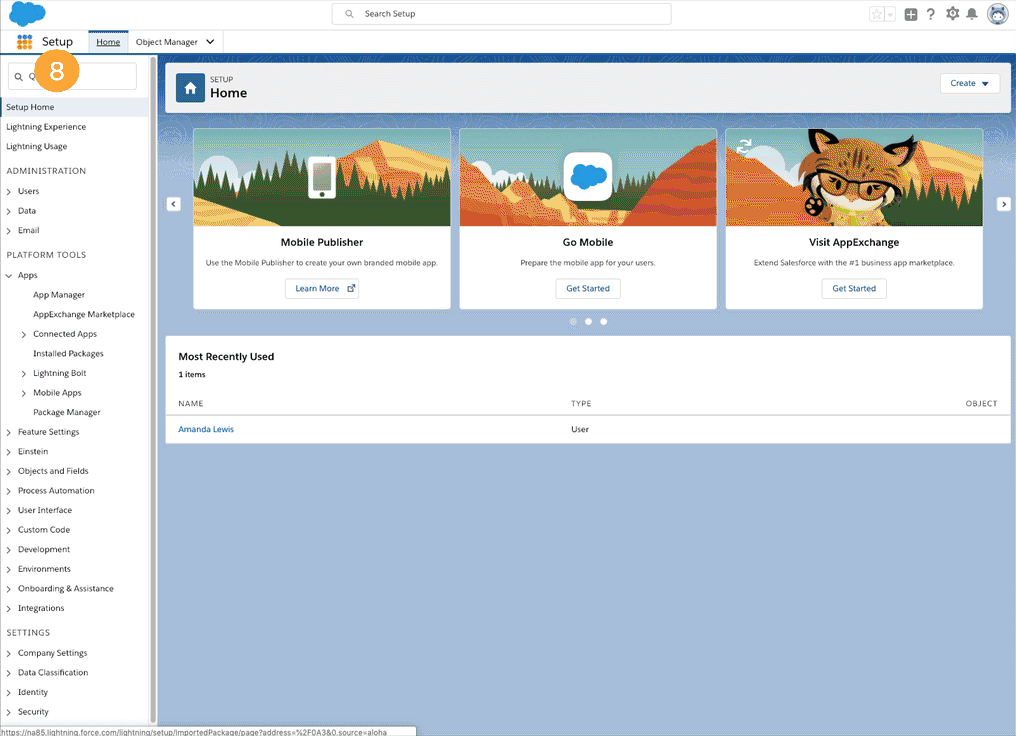
- After the installation has been completed, select the App Launcher section of Salesforce [8].
- Then, select Talkdesk Lightning from the list [9].
- Select the Talkdesk Admin tab [10] and click the Login to Talkdesk [11] button to log in to your Talkdesk account.
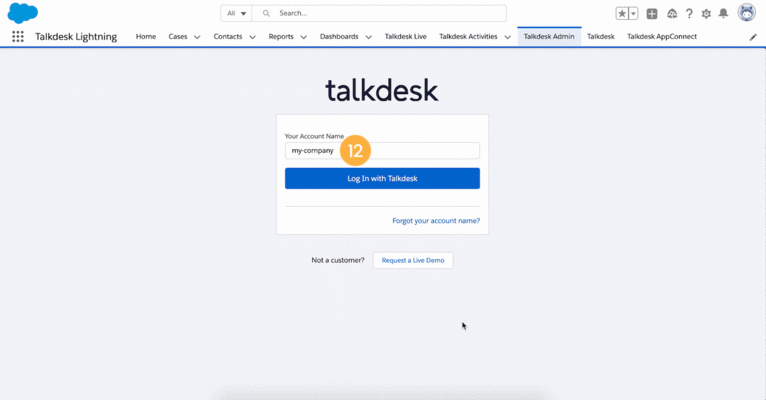
- Enter your Talkdesk account name and then your credentials [12].
- Next, create three Remote Site Settings [13].
Step 2: Designate Integration Settings
On the following page, you can specify the type of objects that you want Talkdesk to sync [14]. Depending on your use case, you can select Contacts, Leads, or both.
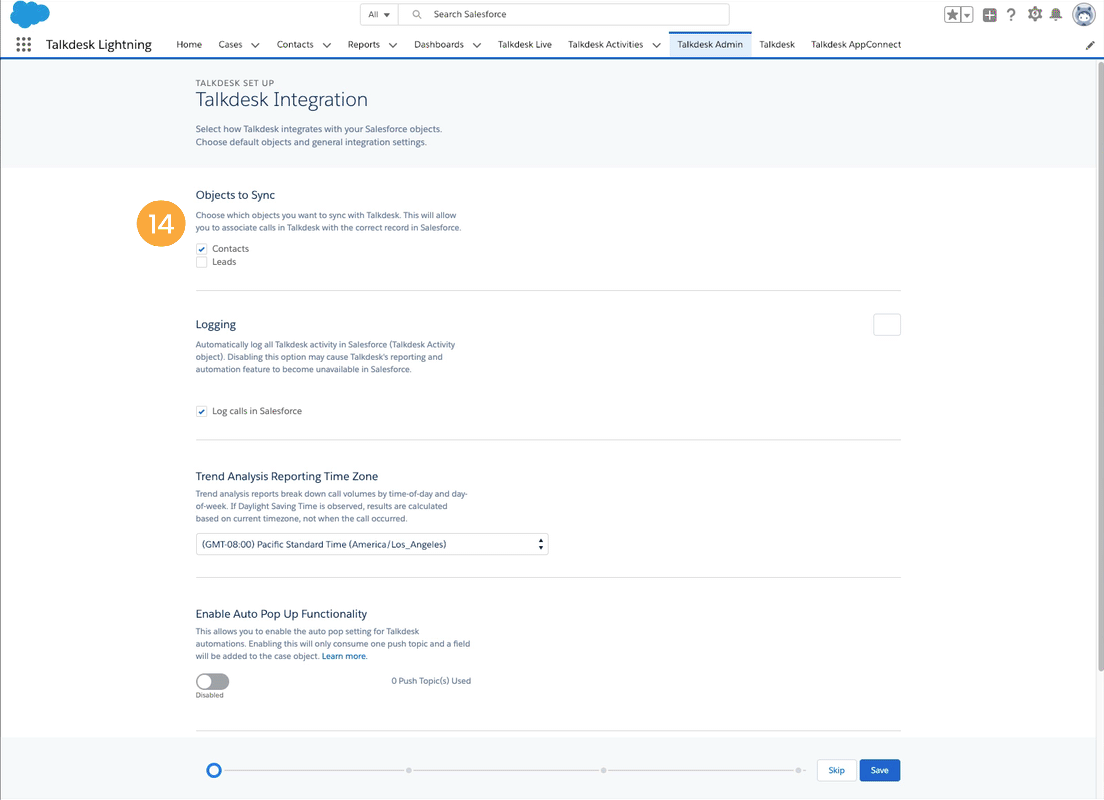
You will also be able to select whether or not you would like Talkdesk calls to be logged in Salesforce [15]. Checking the box will automatically log all calls to the Talkdesk Activity object rather than the Standard Activity call object.
We recommend you keep this box checked so you can correlate call data with your other Salesforce data using Talkdesk for Salesforce’s reporting tools. In the next step, you can enable automations so you can continue logging calls to your Standard Activity call object.
TIP #1: Clicking on the gear icon next to “Logging” will reveal options for generating sample call data. This sample data will be randomly created and logged into your existing Salesforce records. We’ve included this option for our customers who may want to test out Talkdesk for Salesforce’s call reporting templates. You can remove this sample data without altering your real data at any time by returning to this page.
Finally, for example, you can also enable the features Auto Pop Up [16] and Relate to Opportunity or Case [17]. Press Save [18] when you’re done.
There are other features present in this section that you can use. If you’d like to know more about how to configure these features, you can find them on the Talkdesk for Salesforce section of the Knowledge Base.
Note: If you'd like to synchronize deleted contacts and make sure contacts are deleted in Talkdesk when deleted from Salesforce, please make sure to follow these separate instructions.
Step 3: Review Automations
The next step of the configuration process is to review the list of automations currently configured for your call center [19]. On this page, you can enable or disable all available automations.
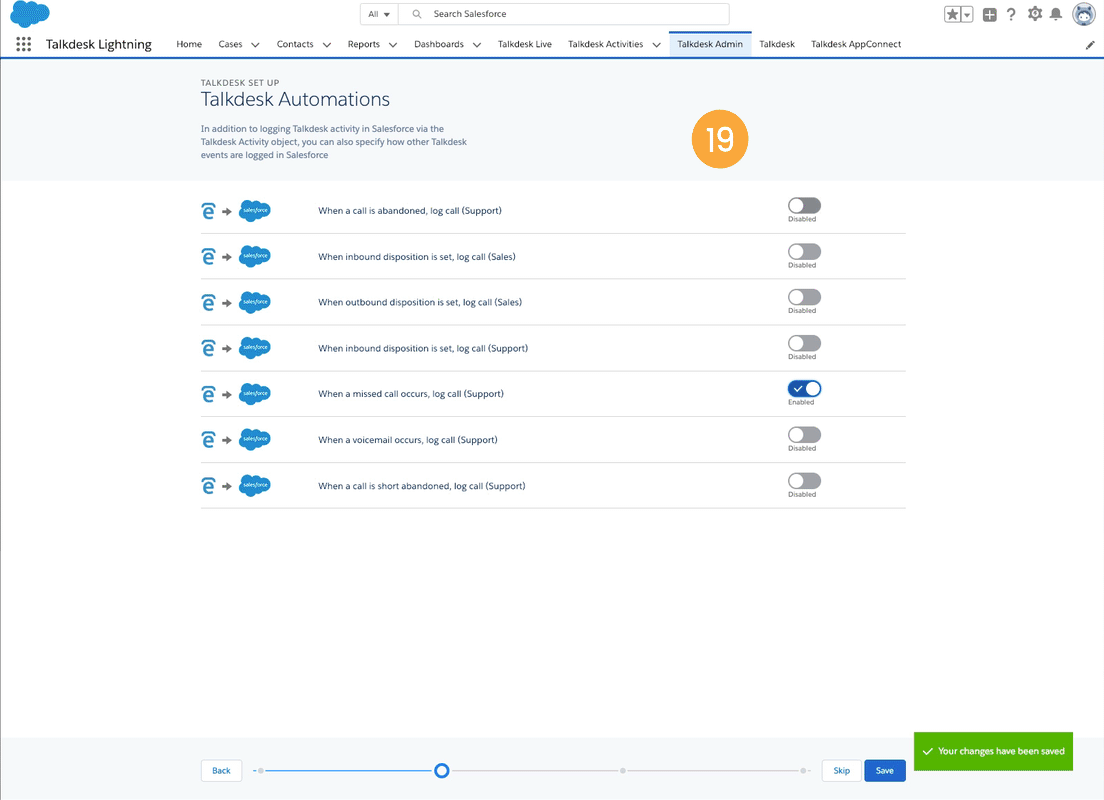
By default, Talkdesk includes 7 predefined automations with the installation package, but you may see more if your call center administrator has already set up additional automations.
We recommend enabling the automations “When an inbound/outbound disposition is set, log call.”
Although the Talkdesk Activity object will log all calls (including missed, abandoned calls, etc.), enabling these automations allows you to leverage the standard Salesforce Activity and Call Logging functionality. This ensures that agents can see interaction history on calls when looking at a contact/lead/case in Salesforce.
Step 4: Add Talkdesk Users
Important: Talkdesk will use the email to sync the agents; please ensure you have only one user per email. If multiple users are created under the same email (even if deactivated) the system may not sync to the correct Salesforce agent.
Adding users to Talkdesk for Salesforce is as simple as checking a box:
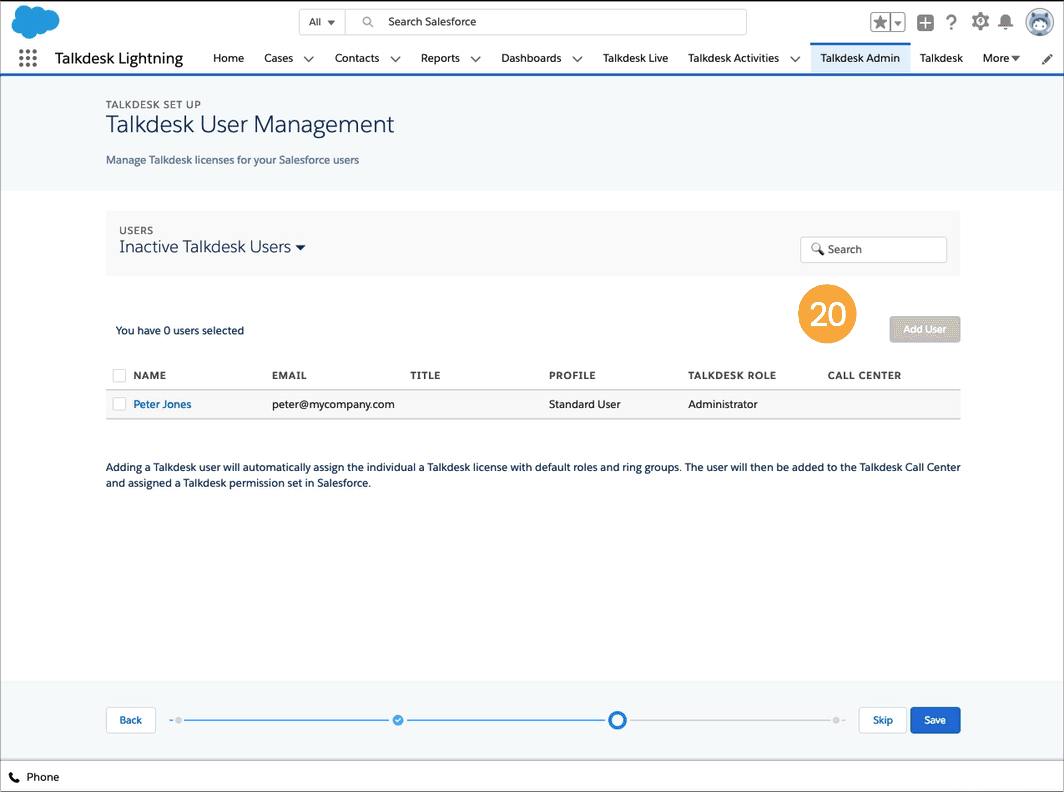
- Simply check the boxes next to the users you want to add to your call center and then hit the Add User button [20].
- A message will pop up asking you to assign your agents a role and a CTI [21]:
- Select which type of role is to be assigned to those users and whether you wish them to use Callbar CTI Electron (Callbar App) or Callbar CTI (Callbar Chrome App).
Note: Callbar CTI is only recommended for those using Chrome OS. Users on Windows, Mac or Linux machines should have Callbar App installed instead and have Callbar CTI Electron configured as the CTI connector.
- Press the Add User button and then Save to proceed. Doing so will automatically:
- Assign Salesforce Permission Sets to control access to Talkdesk components (admin settings, reporting, and others.).
- Assign the selected Talkdesk for Salesforce CTI.
- Allocate the appropriate Talkdesk license
- Assign the selected role in Talkdesk.
TIP #2: Roles in Talkdesk are equivalent to Permission Sets in Salesforce. For this reason, you can override Talkdesk’s default roles without leaving Salesforce by simply modifying Permission Sets. Learn more about Salesforce Permission Sets.
The following Talkdesk roles are available by default in Talkdesk for Salesforce:
- Agent/Custom Role - Maps to User Permission Set in Salesforce
- Supervisors - Maps to Manager Permission Set in Salesforce
- Administrators - Maps to Administrator Permission Set in Salesforce
For example, if you want your agents to be able to access the Talkdesk Live (legacy) dashboard, you need to manually assign them the Talkdesk Manager (or Administrator) Permission Set. The User Permission Set maps to the Agent role in Talkdesk, which by default does not provide access to Talkdesk Live (legacy) - only Supervisors and Admins have this access.
Also, standard users, by default will not be able to Auto Pop Salesforce Cases. To do this they must be manually assigned PushTopic Read permissions.
Learn more about Talkdesk for Salesforce Admin Permission Sets.
You can return to this page in Talkdesk Admin at any time, to add additional users or change roles for existing users.
Note: Adding new users in Salesforce will automatically add the user to your Talkdesk account, however, the opposite is not true. Please make sure to always add new users who will be using Salesforce directly in Salesforce, and not in the Talkdesk main web application, to avoid Callbar errors.
Step 5: Finish
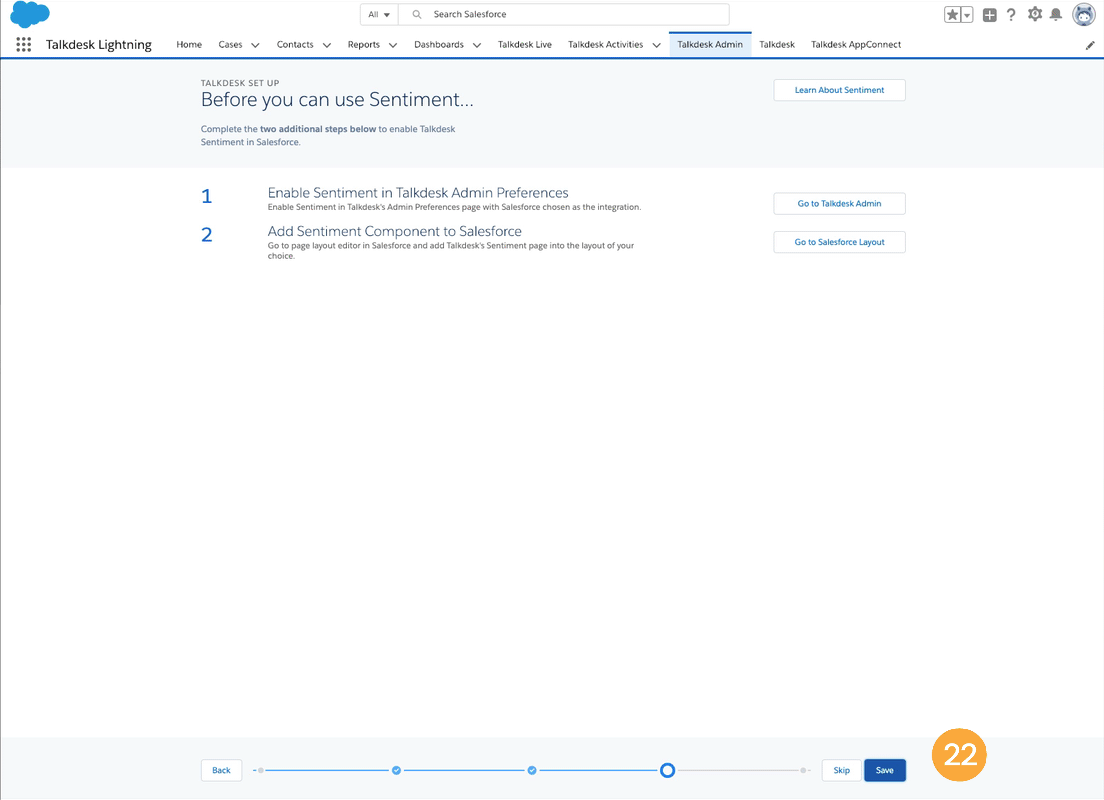
Next, you can configure Sentiment or do this later.
Press Save one last time, to complete the configuration process [22].
Hit Finish [23], and you’re done! You can visit these pages at any time to change your settings.
=============================
The original post is available in Talkdesk by David Runciman
this post has been published through automation. Automation script brings all the top bloggers' posts under a single umbrella.
This blog's purpose is to follow the top Salesforce bloggers and collect all blogs in a single place through automation.
============================
Post a Comment